Most of these things can also be done on iOS, Linux and other operating systems, or with a mixture of them. I have Windows expertise, but no experience with the other systems, so this document is written for Windows.
IGRA conventions are where representatives from our membership vote on revisions to our Bylaws and Rodeo Rules.
To begin with, this was done on paper. Copies of the suggested changes would be duplicated and handed out to the delegates. If something needed correcting or modifying, it was necessary to change the original then make numerous copies of the correction and hand them out again.
As technology progressed, we started saving the documents on USB Thumb drives. When changes took place the document in question would be updated and shown on the projection screen.
At the end of the 2009 convention, there were many thumb drives and the secretary could not tell which documents were the final versions and which might have been rejected, resulting in the 2010 rule book being a mess.
President Helander asked Frank Harrell to see what could be done. Starting at the 2010 Convention, all documents were converted to HTML pages and saved on a common server where the floor could connect via Wi-Fi and watch as the actual file changes were made. This kept only one copy of each document, and saved reams of paper and hours of wasted time.
This document describes the system used, and offers several alternative setups that could be used by just about anyone to acheve the same results.
There are several directions one can go for this project depending on your resources, your technical experience with Windows and networking, and whether or not you have someone who has experience with Windows servers.
As of April 19, 2016, Frank has donated a server for convention use, pre-configured to the following specs. He will retain control of the machine until such time as he retires from service to IGRA. If he retires or in the event of his death, this machine will be transferred to IGRA. A note as such is attached to the machine.
The simplest setup requires availability to a Windows based server and a working knowledge of how to configure it. If you do not have a server available skip to the section called Non Server Setup.
Using IGRA supplyed server, network switch and access point, donated by Cowboy Frank
Experts Only using your own equipment
Equipment
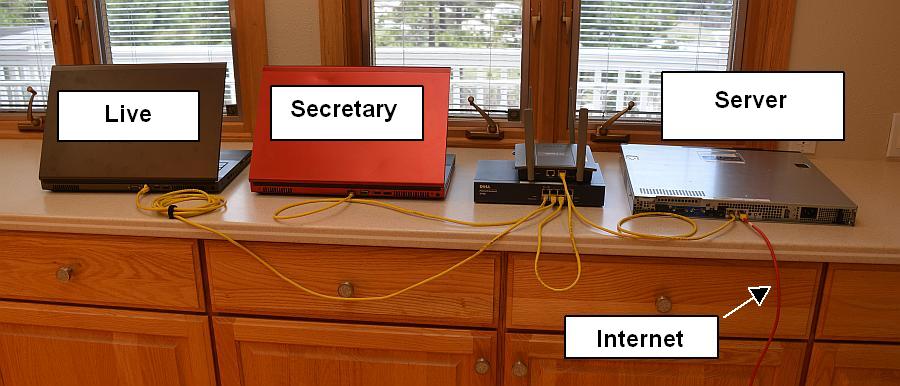
Connect all the equipment as shown in the following photo. The cables going to the routers must be connected to their WAN (sometimes listed as Internet) ports. Don't stack the wireless routers like this, they won't work very well. Spread them out as far as possible. We stacked them here just so we could get the entire setup in the photo. We also left out the power cords and projector cables in this photo.

On the server you need to setup ICS (Internet Connection Sharing).
NOTE, Feb 2019: As of this date, there is a bug in Windows 8/10 which prevents ICS from functioning properly. The work around's people have suggested are very complicated and don't necessarily work in any given instance. Until this bug is fixed, if ever, it is recommended that the computer you chose as your server be running Windows 7.
Install Apache Web Server on the server computer. Apache has not released a Windows install version since 2013. However, you can obtain the last Windows instalable version from their archive page. Look for, download and install this spcific file from the list ( httpd-2.2.25-win32-x86-no_ssl.msi ). This installation will work fine for Convention, but is not recommended for public access servers.
During installation you will need to fill in a domain name, a server name and an email address. If you don't have one, just make one up like mydomain.com, computer.mydomain.com and me@mydomain.com.
Now you need to make a decision. By default, this installation of Apache creates a directory in the program area called /htdocs/. This is where Apache want's you to put your documents, however, that area is normally protected by the operating system and files can't be saved or edited there easily. If you can get help from a Microsoft Windows savvy person, they can modify the permissions of that directory. But if you are on your own, it is much easier to create a directory somewhere else to store Convention documents in.
If you create a new directory, you will need to modify two lines in the Apache httpd.conf file. Use Windows Notepad, or an ASCII text editor to edit this file, not Word or Wordpad, they will corrupt the file.
This file can be found in the Apache conf directory. Because most later versions of Windows restricts access to files in the programs area, you will probably have to move this file to your desktop to edit and save it, then move it back to the conf directory.
Look for the following line (this is the line as it is created in our Apache 2.2.25 installation)
DocumentRoot "C:/Program Files/Apache Software Foundation/Apache2.2/htdocs"
Change it to point to your new directory. IMPORTANT, You MUST use forward slashes '/' not back slashes '\'
A little further down you will find this line
<Directory "C:/Program Files/Apache Software Foundation/Apache2.2/htdocs">
Change that to read the same as above.
Save the file, move it back to the conf directory and restart Apache.
Each time you save the http.conf file, you will need to restart Apache. In the notification area (or hidden icons in Windows 10) you will see a red feather with a round start icon. Clicking that will open the Apache Server Monitor menu. (Note: this utility is not included with current Apache instlations. If you didn't install Apache using the 2.2.25 version listed above, this feature will not be available to you) Select Apache 2.2 then select Restart. Depending on which version of Windows you are using, you may get a dialogue saying you need administrator privilege, or a warning asking if you want to allow this application to run. Chose Yes or run as administrator.
If you get a "The requested operation has failed!" error, you messed something up while editing the httpd.conf file and need to fix it. If you only changed the two lines mentioned above, then you probably got the path to the new directory wrong. If you reopen httpd.conf and it has been corrupted because you used Word or Wordpad, you can find a clean original copy in the subdirectory conf/original/.
The next thing you need to do is open your firewall to allow other computers to read your documents. The way to do this varies between Windows versions. You can either open Port 80, or add the Apache program to the allowed applications list. The Apache program is httpd.exe and is located in the Apache2.2\bin\ folder.
Finally you need to share the directory where the documents will reside. The live editing person and the floor secretary will need shared access to this directory. Right click on the directory and chose 'share with'. The specifics from here can go in a large number of directions so I will leave that research up to you. If you are unsure of how, use YouTube or Google to search on the topic Windows directory sharing.
Reports and rule/bylaws changes should all be submitted in Microsoft Word document format.
You may want to setup separate directories for each committee.
A note on Bylaws and Rodeo Rule proposals: Have each committee submit each proposal in a separate Word document. Otherwise the Convention will have a difficult time finding individual items within a document and a real mess when it comes to managing what rules are passed or failed. If they don't submit them separately, hand them back and insist they break them into separate documents. (Lesson learned from experience the first few years using this system)
Note on file names: Spaces in file names are not legal on the Internet. If these documents are to be placed on the IGRA website, or anywhere else to be accessible across the Internet, do not use spaces in the file name. Use MixedCase names, hyphens-, or underscores _. Yes it will work with spaces, but it can cause a lot of problems.
A note on directories: In some cases, a folder will be created with the same name as the document. This folder stores formatting data and images, if any, associated with the document. This folder is locked to the document and must be moved with the document. If you delete one of these folders, the associated document may also be deleted. These folders can be hidden from the delegates using a special code. See advanced features below for instructions.
You can hide specific file types from the Convention floor by adding a line to the httpd.conf file discussed earlier.
Open the httpd.conf file in Notepad and look for the following line
Options Indexes FollowSymLinks
On the next line, add the following
IndexIgnore thumbs.db *_files
which will hide the Windows thumbs.db files along with the associated directories connected to some documents mentioned in the Creating Convention Documents above. Include a space between each file type to be hidden. Wildcards are allowed.
Going Fancy: It is possible to get really fancy and even make the indexes look like a full website by using Apache Fancy Indexing. On my setup, the index pages at Convention look just like the IGRA website.
Open the httpd.conf file again and look for the following line
Options Indexes FollowSymLinks
Add an extra line below and insert the following code
IndexOptions FancyIndexing
For more details on how to fancy up the indexes see the Indexing section on the Apache website. You need to have some experience with html and style sheets to work with these features.